Design Dilemma: Words of Advice on Recessed Lights
I’ve always had a thing about recessed lights. I grew up in an older home built in a pre-recessed lights era. When visiting the homes of friends with younger, seemingly more glamorous homes, I always noticed the ubiquity of recessed lights. To my young eyes, they seemed modern, cast a warm focused glow, and could be dimmed or brightened depending on the task at hand. None of that was true of the simple glass overhead light fixtures in my own less-chic home.
Fast foward to today and I have finally achieved recess lights in my own home. I enjoy them on a daily basis for the cozy light they cast and their sheer utility and flexibility, but when I had them installed, I had no idea that lighting professionals have rules that they follow to determine how and what you should install.
- Determine the total lumens you need by assessing the space you want to light. These days, more of us are buying LEDs or compact flourescent bulbs rather than halogens or incandescents. One simple formula for deciding how much light you need is to multiply the ceiling height by 4. That will give you the area in square feet that one recessed light will cover. For example if you have a 10′ ceiling, you will need a recessed light for roughly every 40 square feet. Another formula involves multiplying the area of the room by 1.5 to get the total wattage required in a room. You can then divide that number by the bulb wattage you want to use (you will have to convert to lumens if you’re using LED lights).
- LED vs. Halogen? Just about anyone drawing up a lighting plan these days will recommend LED lights over incandescent and halogen bulbs. You’ll save on your energy bill and they’ll last a lot longer.
- Pay attention to light placement. Measure at least 2 feet off all your walls onto the ceiling to start. Aim to divide your can lights around the room evenly and leave at least 2 feet between each fixture. You may have to remove or add a can light to get the spacing right. One general rule of thumb is to place 4-inch lights 4 feet apart and 6-inch lights 6 feet apart.
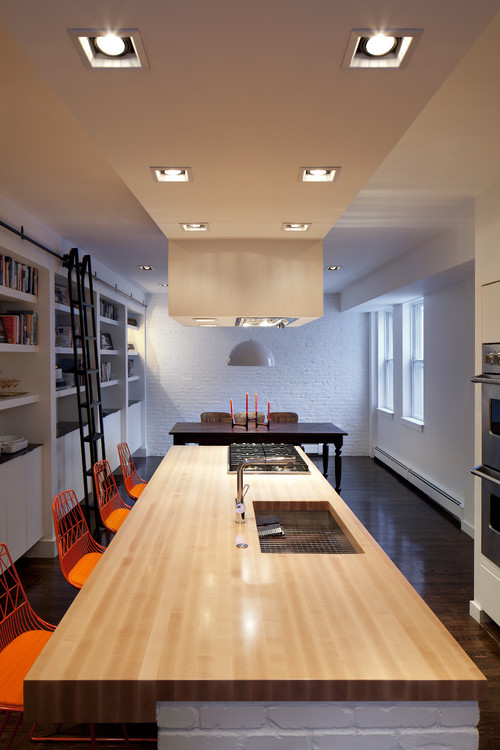
In the kitchen below, lights were planned to be placed above the work and dining area:
- Zone your lights and add a dimmer. Zoning your lights will give you maximum flexibility, and will reduce your electric bill. It will also allow you to dim your lights or flick a few on but not all when you’re looking to create mood lighting. For instance, putting the above kitchen lights on a dimmer can transform a work space into a more intimate setting for parties and gatherings. In my own ceiling, I installed six lights on two zones that can be dimmed or brightened according to my activity.
- Know your ceiling. If you live below another apartment and your ceilings are concrete, recessed lighting can compromise the structural integrity of the building.
- Create a focal point with your lighting. Illuminating artwork with gimbal lights is a nice touch of glamour in a room. Gimbal fixtures rotate, revolve and swivel, so you can focus the light exactly where you want it.
Something like this instantly highlights artwork:
- Recessed lighting in the bathroom is useful but must be chosen for damp conditions.
Lights exposed to moisture need to be rated accordingly. Make sure you’re using bulbs that are damp rated. When installing lights in a bathroom, your objective is to light the vanity area. Try using at least two gimbal downlights, fitted close to the mirror. Space them so that the light output from one overlaps the other.
Other tips:
- A recessed light in corners can make the room appear larger.
- Avoid placing a recessed light directly over a chair or sofa as it creates unforgiving shadows on faces.
- Be careful not to put too many cans in a ceiling — you don’t want it to mimic an airstrip.
- The trend is toward smaller4-inch recessed lights rather than larger ones.
The Secret Dichotomy of Soplo House
An intriguing house from Cazú Zegers G is the fruit of a conflict between two design aesthetics.
This curvy maze-like entrance to Soplo House is conceived as a “pavilion open to the landscape.”
The architect says it was “inspired by the experience of walking through the sculpture of Richard Serra in Guggenheim Bilbao with my daughter Clara.”
The entry is accessed down the flight of obscured stairs – hermetically sealed and enclosed by the curved walls.
Set in Camino Punta de Aguilas interior, Santiago, Chile, Soplo House is inspired by “the shapes that draws the wind on the sand.”
Soplo is Spanish for breath, “which breathes life, is the wind that passes smoothly through the openings.”
He describes the curves as “designed in a double system of golden ratios, which give form to the breath.”
Giving rise to this unique skylight, the curved exterior walls continue within to the interior…
But once fully inside the house, here, the curves end.
Because in an abrupt about-face, the entire front of the house is entirely linear. Read the rest of this entry »
Harsh Sunlight is Filtered in Le Clos des Sablieres in the South of France
Le Clos des Sablieres apartment complex in Bordeaux, France has an exterior skin almost like a wall of louvered wooden shutters set a good distance in front of the passageway entrances to each apartment.
At the top floor, glass panels replace the exterior skin of wooden louvres, and are set a distance away, allowing fresh air into the access way for the apartment complex.
The gaudy coloration is a bright spot in a depressing landscape of urban architecture.
The apartments open to both sides allowing light on both sides.

The louvered passageway allows fresh air to circulate, but filters the hot sunlight of the South of France.

Although painted a bright and cheery red, the interior passage is a little reminiscent of the efficient industrial style of a prison complex. Read the rest of this entry »


